Completing the Employer Onboarding for Payroll
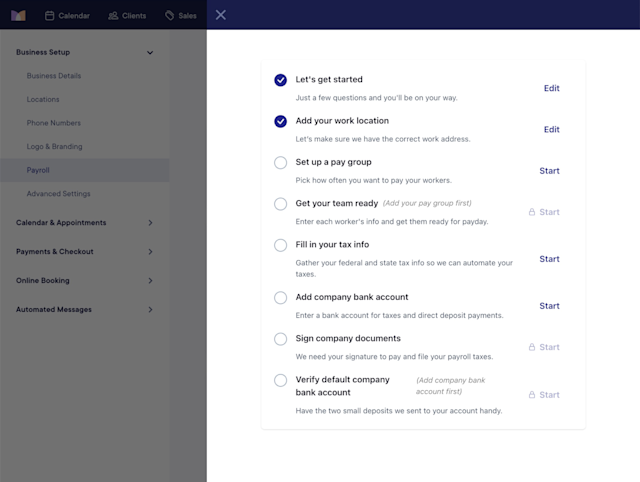
This article provides guidelines for completing each section of the employer onboarding for Payroll Processing. Admin users will receive daily email reminders if there are any onboarding tasks that must be completed to begin processing payroll.

Link copiedLet’s get startedLink copied
In the Let’s get started section, enter the requested information to personalize your onboarding experience.
Your first payday is the first date you’d like to begin paying your workers through Mangomint. Keep in mind this date is not final—this date is simply for the Mangomint team so we can help you stay on track and complete your onboarding in time for your first payday.
Let us know if you’ve paid any workers this year. If you have, we will contact you to help you migrate your previous payroll history. This step is important to ensure all your payroll taxes are properly transferred.
Link copiedAdd your work locationLink copied
In the Add your work location section, enter all the addresses where you have staff members physically working.
If you change your address in Apps > Settings > Business Setup > Locations after onboarding, make sure you also update the address in this section (it will not be updated automatically).
Your default work location, principal address, and filing address do not all need to be the same address.
The table below outlines the different address types.
Address type | Description |
|---|---|
Default work location | The default work location for any new workers you add. If you have multiple work locations, you do not need to specify a default work location. You will be able to choose each worker’s default work location manually. |
Principal address | The address included on your workers’ paystubs such as your main office or headquarters. This address does not need to match the address you have on file with the IRS. |
Filing address | The address you have on file with the IRS. This address is also known as the legal address, and it is used when sending payroll filings to tax agencies. You will specify this address in the Fill in your tax info section. |
For example, if all of your workers work at 1600 Grand St., that will be both the Default work location and Principal address. If you use a different address for your company’s taxes (157 Brookside Ave.), that will be the Filing address.
Link copiedSet up a pay groupLink copied
In the Set up a pay group section, specify how often you’d like to pay your workers.
A pay group is a group of workers. Each pay group has an assigned pay frequency.
You can name your pay groups however you’d like. For example, you can name your pay group Bi-weekly if the workers in that pay group are paid every other week.
You can create multiple pay groups if you pay different groups of workers at different times. For example, you can assign your 1099 contractors to a weekly pay group and your W-2 employees to a bi-weekly pay group. There is no additional cost to create or use multiple pay groups.
If you specify a default pay group, any new workers will be added to that pay group automatically.
Link copiedDetermining your pay dates and pay periodsLink copied
The image below shows an example of pay dates and pay periods. In this example, the worker is paid every other week.
For direct deposit, your pay period must end at least 4 days before your pay date.

Link copiedGet your team readyLink copied
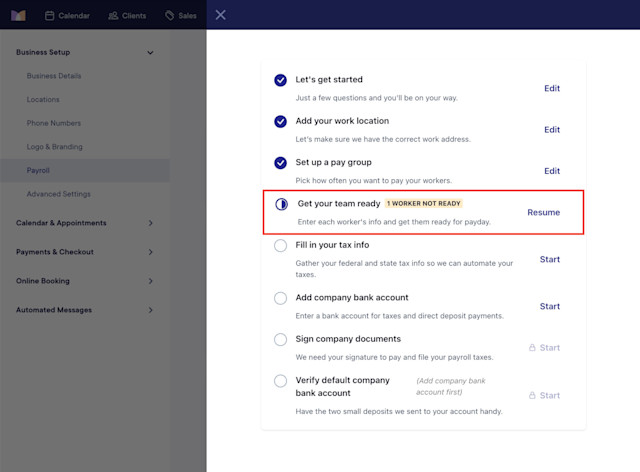
In the Get your team ready section, set up your workers for payroll. If you need help determining a worker’s classification, please consult an accountant.
Once you begin this section, you will be able to see if there are any workers in this step who require more information to be ready for payday.

Link copiedInviting workersLink copied
If you invite workers to enter their own payroll details, they will receive an email with a link where they can enter their information, including their direct deposit details. Workers must complete their email invitation to be paid through Payroll Processing.
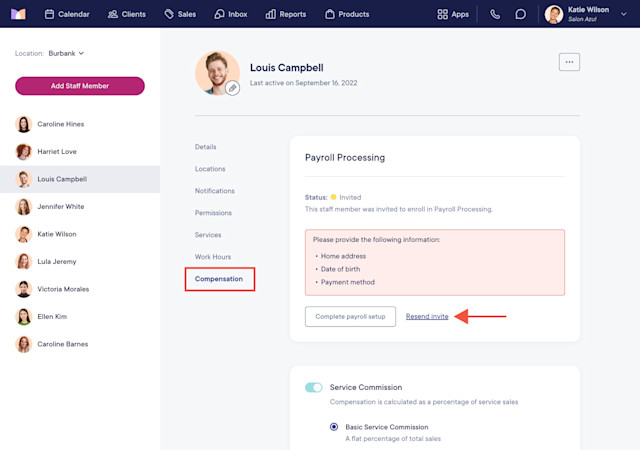
If you need to resend an email invitation to a worker, go to Apps > Staff Members and select the staff member.
Select the Compensation tab and select Resend invite.

Link copiedOvertime eligibilityLink copied
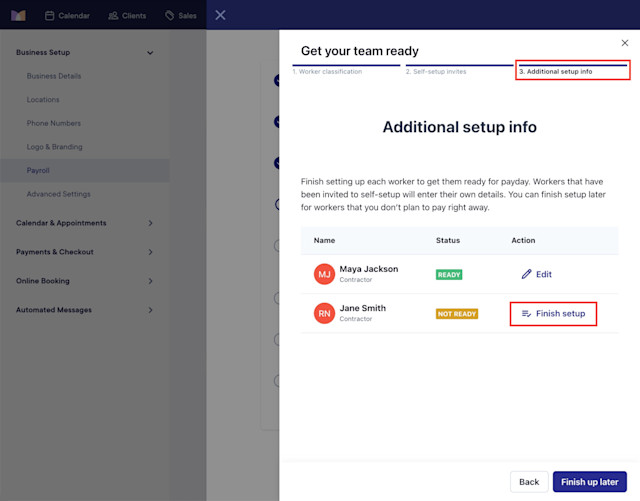
In the Additional setup info step, select Finish setup for each worker and specify whether the worker is eligible for overtime pay. You will not be able to pay workers until their overtime eligibility is specified.

Link copiedFill in your tax infoLink copied
In the Fill in your tax info section, enter your federal and state tax information. If you need help completing this section, please consult an accountant.
An FEIN and EIN are the same number (Employer Identification Number).
In the Federal tax info step, specify your Federal deposit schedule that was given to you by the IRS when you received your EIN. You can leave the Effective date as is.
It’s important that you select your correct schedule to avoid any penalties. If you don’t know your federal deposit schedule, you can select Semi-weekly. However, consider contacting the IRS to confirm your correct federal deposit schedule.
In the State tax info step, specify the state tax information (e.g. account number, IDs, rates, deposit schedules) for each work location you entered (each state where your workers live and work). You do not need to complete this step if you only have 1099 contractors.
Link copiedAdd company bank accountLink copied
In the Add company bank account section, specify the default company bank account to use for taxes and direct deposit payments.
You can either:
Add and verify the bank account using Plaid.
Add the bank account manually and verify it using two small deposits. The two small deposits should appear in the bank account in 1-2 business days.
In this section, you will sign a Debit Authorization form to allow us to debit the account for taxes and direct deposit payments.
Link copiedSign company documentsLink copied
In the Sign company documents section, provide your signature to allow us to pay and file your payroll taxes.
In this section, you will sign any required documents based on the information you provided in the previous sections. Example forms include the Reporting Agent Authorization form and Power of Attorney form.
Link copiedVerify default company bank accountLink copied
In this section, enter the amount of the two small deposits sent to the account. This section is only required if you need to manually verify your default company bank account (if you didn’t use Plaid).

Can't find what you're looking for?
with us to talk to a real person and get your questions answered, or browse our on-demand videos.