Setup Guide for Admin Users
This article covers how to set up your Mangomint account as an Admin user. Admin users usually include business owners and managers who are responsible for setting up and managing their Mangomint account.
Link copiedGet Started pageLink copied
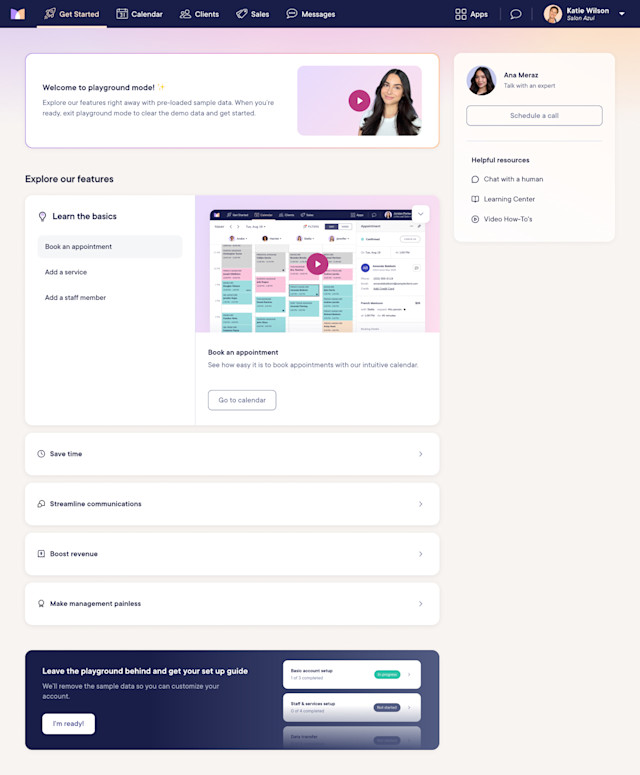
Your Get Started page includes helpful videos and a Setup Guide to help you become familiar with Mangomint and set up your account.

Link copiedPlayground modeLink copied
When you first sign up, your Mangomint account will be in playground mode. Playground mode adds sample data to your account so you can try out Mangomint’s features in a test environment. A Demo label is added next to any sample data.
You can disable playground mode by selecting I'm ready! on your Get Started page.
- Link copied
What happens when playground mode is disabled?
Link copiedOnboarding sessionLink copied
Your onboarding session is a 30-minute call where one of our Onboarding Managers will guide you through the process of setting up your account.
Your Onboarding Manager will discuss the following with you:
Data import and transition from your previous scheduling software
Processing sales using Mangomint
Any questions you have about Mangomint or the onboarding process
Link copiedData importLink copied
If you are transferring to Mangomint from a previous scheduling software, our team is happy to import your data.
For most systems, we can import the following:
Clients (including contact details): It will take about 24 hours to import your clients once we receive all your client information.
Products, inventory, and gift cards: We will import your products, inventory, and gift cards a few days before your launch date to ensure you have more accurate stock levels and gift card balances.
Depending on your previous scheduling software, we may or may not be able to import client notes, formulas, previous sales, and previous appointments. Your Onboarding Manager will discuss this with you during your onboarding session.
Link copiedVideo & article resourcesLink copied
Here are a few videos that can help you set up your account:
Service Provider Setup: This video can help you learn how to set up your service providers, including inviting staff members, updating compensation settings, and customizing work schedules.
Video Library: Visit our Video Library to watch on-demand videos and learn about different Mangomint features in detail.
Here are a few articles that can help you set up your account:
Business Setup: Set up your business details, locations, branding, etc.
Cancellations & Rescheduling: Set up your cancellation policy, enable self-cancellations, etc.
Apps & Integrations: Enable and disable apps, manage integrations, etc.
Staff Setup: Set up and invite your staff members, adjust staff work schedules, etc.
Services Setup: Set up your services, service customizations (add-ons), etc.
Online Booking Setup: Enable online booking, adjust online booking preferences, etc.
Automated Messages: Customize automated emails and text messages.
Payments: Learn about client payment methods, set up your Front Desk Display, etc.
Link copiedLaunch dateLink copied
Your launch date is the date you will start to use Mangomint as your day-to-day scheduling software and turn off your previous scheduling software. Picking a launch date will help you determine which future appointments from your previous scheduling software you will need to transfer into Mangomint. You only need to transfer future appointments from your launch date onward.
Link copiedTransfer future appointmentsLink copied
If you are transferring to Mangomint from a previous scheduling software, you will need to manually transfer future appointments (from your launch date onward) into Mangomint.
Before transferring future appointments, disable your automated messages in Mangomint so that your clients don’t receive notifications as you work through the transfer process.
If you are importing your client list into Mangomint, please wait until we have finished importing clients before transferring appointments.
During the transfer process, keep the appointments up to date in both your previous software and Mangomint. Any change to a future appointment (such as rescheduling or cancellation) should be made in both systems.
Learn more about creating appointments.
Link copiedStart your subscriptionLink copied
Visit our website to compare Mangomint plans and find the plan that works for you. When you're ready, start your Mangomint subscription.
Link copiedLearn the basics in MangomintLink copied
Learn more about the basics of the Mangomint platform, including navigating between different apps, adding notes, and more.

Can't find what you're looking for?
with us to talk to a real person and get your questions answered, or browse our on-demand videos.